Android-Clipboard Tutorial
Android provides the clipboard framework for copying and pasting different types of data. The data could be text, images, binary stream data or other complex data types.
Android provides the library of ClipboardManager and ClipData and ClipData.item to use the copying and pasting framework.In order to use clipboard framework, you need to put data into clip object, and then put that object into system wide clipboard.
In order to use clipboard , you need to instantiate an object of ClipboardManager by calling thegetSystemService() method. Its syntax is given below −
ClipboardManager myClipboard;
myClipboard = (ClipboardManager)getSystemService(CLIPBOARD_SERVICE);
Copying data
The next thing you need to do is to instantiate the ClipData object by calling the respective type of data method of the ClipData class. In case of text data , the newPlainText method will be called. After that you have to set that data as the clip of the Clipbaoard Manager object.Its syntax is given below −
ClipData myClip;
String text = "hello world";
myClip = ClipData.newPlainText("text", text);
myClipboard.setPrimaryClip(myClip);
The ClipData object can take these three form and following functions are used to create those forms.
| Sr.No | ClipData Form & Method |
|---|---|
| 1 | Text newPlainText(label, text) Returns a ClipData object whose single ClipData.Item object contains a text string. |
| 2 | URI newUri(resolver, label, URI) Returns a ClipData object whose single ClipData.Item object contains a URI. |
| 3 | Intent newIntent(label, intent) Returns a ClipData object whose single ClipData.Item object contains an Intent. |
Pasting data
In order to paste the data, we will first get the clip by calling the getPrimaryClip() method. And from that click we will get the item in ClipData.Item object. And from the object we will get the data. Its syntax is given below −
ClipData abc = myClipboard.getPrimaryClip();
ClipData.Item item = abc.getItemAt(0);
String text = item.getText().toString();
Apart from the these methods , there are other methods provided by the ClipboardManager class for managing clipboard framework. These methods are listed below −
| Sr.No | Method & description |
|---|---|
| 1 | getPrimaryClip() This method just returns the current primary clip on the clipboard |
| 2 | getPrimaryClipDescription() This method returns a description of the current primary clip on the clipboard but not a copy of its data. |
| 3 | hasPrimaryClip() This method returns true if there is currently a primary clip on the clipboard |
| 4 | setPrimaryClip(ClipData clip) This method sets the current primary clip on the clipboard |
| 5 | setText(CharSequence text) This method can be directly used to copy text into the clipboard |
| 6 | getText() This method can be directly used to get the copied text from the clipboard |
Example
Here is an example demonstrating the use of ClipboardManager class. It creates a basic copy paste application that allows you to copy the text and then paste it via clipboard.
To experiment with this example , you can run this on an actual device or in an emulator.
| Steps | Description |
|---|---|
| 1 | You will use Android studio IDE to create an Android application and under a package com.example.sairamkrishna.myapplication. While creating this project, make sure you Target SDK and Compile With at the latest version of Android SDK to use higher levels of APIs. |
| 2 | Modify src/MainActivity.java file to add necessary code. |
| 3 | Modify the res/layout/activity_main to add respective XML components |
| 4 | Run the application and choose a running android device and install the application on it and verify the results |
Following is the content of the modified main activity file src/MainActivity.java.
package com.example.sairamkrishna.myapplication;

import android.bluetooth.BluetoothAdapter;
import android.bluetooth.BluetoothDevice;

import android.content.ClipData;
import android.content.ClipboardManager;
import android.content.DialogInterface;
import android.content.Intent;
import android.content.IntentFilter;

import android.os.BatteryManager;
import android.support.v7.app.ActionBarActivity;
import android.os.Bundle;

import android.view.Menu;
import android.view.MenuItem;
import android.view.View;

import android.widget.ArrayAdapter;
import android.widget.Button;
import android.widget.EditText;
import android.widget.ListView;
import android.widget.TextView;
import android.widget.Toast;

import java.util.ArrayList;
import java.util.Set;


public class MainActivity extends ActionBarActivity {
   EditText ed1,ed2;
   Button b1,b2;

   private ClipboardManager myClipboard;
   private ClipData myClip;.

   @Override
   protected void onCreate(Bundle savedInstanceState) {
      super.onCreate(savedInstanceState);
      setContentView(R.layout.activity_main);

      ed1=(EditText)findViewById(R.id.editText);
      ed2=(EditText)findViewById(R.id.editText2);

      b1=(Button)findViewById(R.id.button);
      b2=(Button)findViewById(R.id.button2);

      myClipboard = (ClipboardManager)getSystemService(CLIPBOARD_SERVICE);

      b1.setOnClickListener(new View.OnClickListener() {
         @Override
         public void onClick(View v) {
            String text;
            text = ed1.getText().toString();

            myClip = ClipData.newPlainText("text", text);
            myClipboard.setPrimaryClip(myClip);

            Toast.makeText(getApplicationContext(), "Text Copied",Toast.LENGTH_SHORT).show();
         }
      });

      b2.setOnClickListener(new View.OnClickListener() {
         @Override
         public void onClick(View v) {
            ClipData abc = myClipboard.getPrimaryClip();
            ClipData.Item item = abc.getItemAt(0);

            String text = item.getText().toString();
            ed2.setText(text);

            Toast.makeText(getApplicationContext(), "Text Pasted",Toast.LENGTH_SHORT).show();
         }
      });
   }

   @Override
   protected void onDestroy() {
      super.onDestroy();
   }

   @Override
   public boolean onCreateOptionsMenu(Menu menu) {
      // Inflate the menu; this adds items to the action bar if it is present.
      getMenuInflater().inflate(R.menu.menu_main, menu);
      return true;
   }

   @Override
   public boolean onOptionsItemSelected(MenuItem item) {
      // Handle action bar item clicks here. The action bar will
      // automatically handle clicks on the Home/Up button, so long
      // as you specify a parent activity in AndroidManifest.xml.

      int id = item.getItemId();

      //noinspection SimplifiableIfStatement
      if (id == R.id.action_settings) {
         return true;
      }
      return super.onOptionsItemSelected(item);
   }
}
Following is the modified content of the xml res/layout/activity_main.xml.
<RelativeLayout xmlns:android="http://schemas.android.com/apk/res/android"
   xmlns:tools="http://schemas.android.com/tools" android:layout_width="match_parent"
   android:layout_height="match_parent" android:paddingLeft="@dimen/activity_horizontal_margin"
   android:paddingRight="@dimen/activity_horizontal_margin"
   android:paddingTop="@dimen/activity_vertical_margin"
   android:paddingBottom="@dimen/activity_vertical_margin"
   tools:context=".MainActivity">

   <TextView android:text="Example" android:layout_width="wrap_content"
      android:layout_height="wrap_content"
      android:id="@+id/textview"
      android:textSize="35dp"
      android:layout_alignParentTop="true"
      android:layout_centerHorizontal="true" />

   <TextView
      android:layout_width="wrap_content"
      android:layout_height="wrap_content"
      android:text="Tutorials point"
      android:id="@+id/textView"
      android:layout_below="@+id/textview"
      android:layout_centerHorizontal="true"
      android:textColor="#ff7aff24"
      android:textSize="35dp" />

   <ImageView
      android:layout_width="wrap_content"
      android:layout_height="wrap_content"
      android:id="@+id/imageView"
      android:src="@drawable/abc"
      android:layout_below="@+id/textView"
      android:layout_centerHorizontal="true" />

   <EditText
      android:layout_width="wrap_content"
      android:layout_height="wrap_content"
      android:id="@+id/editText"
      android:layout_alignParentRight="true"
      android:layout_alignParentEnd="true"
      android:hint="Copy text"
      android:layout_below="@+id/imageView"
      android:layout_alignLeft="@+id/imageView"
      android:layout_alignStart="@+id/imageView" />

   <EditText
      android:layout_width="wrap_content"
      android:layout_height="wrap_content"
      android:id="@+id/editText2"
      android:layout_alignLeft="@+id/editText"
      android:layout_alignStart="@+id/editText"
      android:hint="paste text"
      android:layout_below="@+id/editText"
      android:layout_alignRight="@+id/editText"
      android:layout_alignEnd="@+id/editText" />

   <Button
      android:layout_width="wrap_content"
      android:layout_height="wrap_content"
      android:text="Copy text"
      android:id="@+id/button"
      android:layout_below="@+id/editText2"
      android:layout_alignLeft="@+id/editText2"
      android:layout_alignStart="@+id/editText2" />

   <Button
      android:layout_width="wrap_content"
      android:layout_height="wrap_content"
      android:text="Paste text"
      android:id="@+id/button2"
      android:layout_below="@+id/editText2"
      android:layout_alignRight="@+id/editText2"
      android:layout_alignEnd="@+id/editText2" />

</RelativeLayout>
Following is the content of the res/values/string.xml.
<resources>
   <string name="app_name">My Application</string>
   <string name="hello_world">Hello world!</string>
   <string name="action_settings">Settings</string>
</resources>
Following is the content of AndroidManifest.xml file.
<?xml version="1.0" encoding="utf-8"?>
<manifest xmlns:android="http://schemas.android.com/apk/res/android"
   package="com.example.clipboard"
   android:versionCode="1"
   android:versionName="1.0" >

   <application
      android:allowBackup="true"
      android:icon="@drawable/ic_launcher"
      android:label="@string/app_name"
      android:theme="@style/AppTheme" >

      <activity
         android:name="com.example.sairamkrishna.myapplication.MainActivity"
         android:label="@string/app_name" >

         <intent-filter>
            <action android:name="android.intent.action.MAIN" />
            <category android:name="android.intent.category.LAUNCHER" />
         </intent-filter>

      </activity>
   </application>

</manifest>
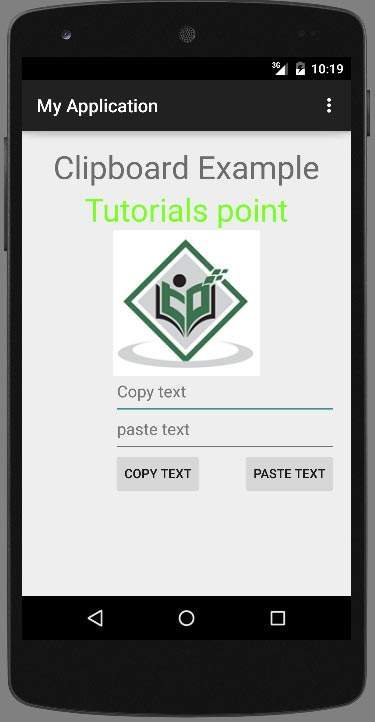
Let's try to run our an application we just modified. I assume you had created your AVD while doing environment setup. To run the app from Android studio, open one of your project's activity files and click Run  icon from the tool bar. Android studio installer will display following images −
 icon from the tool bar. Android studio installer will display following images −
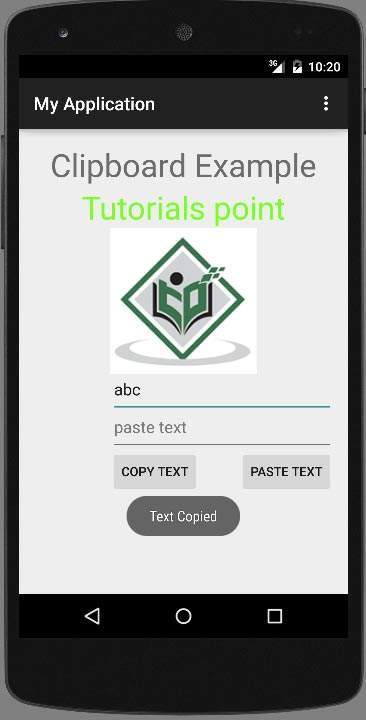
Now just enter any text in the Text to copy field and then select the copy text button. The following notification will be displayed which is shown below −

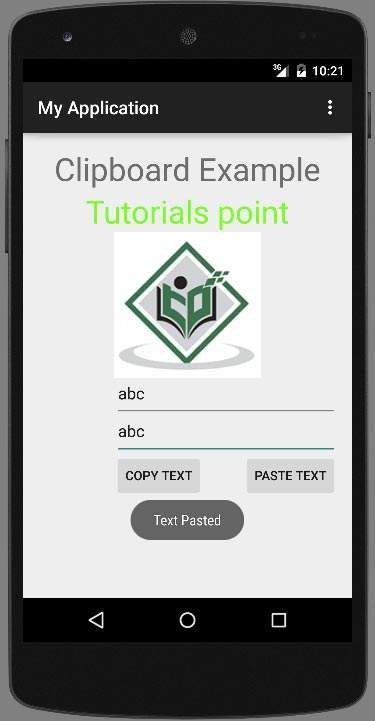
Now just press the paste button, and you will see the text which is copied is now pasted in the field of Copied Text. It is shown below −
