Android WebView Tutorial
WebView is a view that display web pages inside your application. You can also specify HTML string and can show it inside your application using WebView. WebView makes turns your application to a web application.
In order to add WebView to your application, you have to add <WebView> element to your xml layout file. Its syntax is as follows −
<WebView  xmlns:android="http://schemas.android.com/apk/res/android"
   android:id="@+id/webview"
   android:layout_width="fill_parent"
   android:layout_height="fill_parent"
/>
In order to use it, you have to get a reference of this view in Java file. To get a reference, create an object of the class WebView. Its syntax is −
WebView browser = (WebView) findViewById(R.id.webview);
In order to load a web url into the WebView, you need to call a method loadUrl(String url)of the WebView class, specifying the required url. Its syntax is:
browser.loadUrl("http://www.tutorialspoint.com");
Apart from just loading url, you can have more control over your WebView by using the methods defined in WebView class. They are listed as follows −
| Sr.No | Method & Description |
|---|---|
| 1 | canGoBack() This method specifies the WebView has a back history item. |
| 2 | canGoForward() This method specifies the WebView has a forward history item. |
| 3 | clearHistory() This method will clear the WebView forward and backward history. |
| 4 | destroy() This method destroy the internal state of WebView. |
| 5 | findAllAsync(String find) This method find all instances of string and highlight them. |
| 6 | getProgress() This method gets the progress of the current page. |
| 7 | getTitle() This method return the title of the current page. |
| 8 | getUrl() This method return the url of the current page. |
If you click on any link inside the webpage of the WebView , that page will not be loaded inside your WebView. In order to do that you need to extend your class from WebViewClientand override its method. Its syntax is −
private class MyBrowser extends WebViewClient {
   @Override
   public boolean shouldOverrideUrlLoading(WebView view, String url) {
      view.loadUrl(url);
      return true;
   }
}
Example
Here is an example demonstrating the use of WebView Layout. It creates a basic web application that will ask you to specify a url and will load this url website in the WebView.
To experiment with this example, you need to run this on an actual device on which internet is running.
| Steps | Description |
|---|---|
| 1 | You will use Android studio to create an Android application under a package com.example.sairamkrishna.myapplication. While creating this project, make sure you Target SDK and Compile With at the latest version of Android SDK to use higher levels of APIs. |
| 2 | Modify src/MainActivity.java file to add WebView code. |
| 3 | Modify the res/layout/activity_main to add respective XML components |
| 4 | Modify the AndroidManifest.xml to add the necessary permissions |
| 5 | Run the application and choose a running android device and install the application on it and verify the results. |
Following is the content of the modified main activity file src/MainActivity.java.
package com.example.sairamkrishna.myapplication;

import android.app.Activity;
import android.os.Bundle;

import android.view.Menu;
import android.view.MenuItem;
import android.view.View;

import android.webkit.WebView;
import android.webkit.WebViewClient;

import android.widget.Button;
import android.widget.EditText;
import android.widget.TextView;
import android.widget.Toast;

import java.io.FileInputStream;
import java.io.FileOutputStream;

public class MainActivity extends Activity  {
   Button b1;
   EditText ed1;

   private WebView wv1;
   @Override
   protected void onCreate(Bundle savedInstanceState) {
      super.onCreate(savedInstanceState);
      setContentView(R.layout.activity_main);

      b1=(Button)findViewById(R.id.button);
      ed1=(EditText)findViewById(R.id.editText);

      wv1=(WebView)findViewById(R.id.webView);
      wv1.setWebViewClient(new MyBrowser());

      b1.setOnClickListener(new View.OnClickListener() {
         @Override
         public void onClick(View v) {
            String url = ed1.getText().toString();

            wv1.getSettings().setLoadsImagesAutomatically(true);
            wv1.getSettings().setJavaScriptEnabled(true);
            wv1.setScrollBarStyle(View.SCROLLBARS_INSIDE_OVERLAY);
            wv1.loadUrl(url);
         }
      });
   }

   private class MyBrowser extends WebViewClient {
      @Override
      public boolean shouldOverrideUrlLoading(WebView view, String url) {
         view.loadUrl(url);
         return true;
      }
   }

   @Override
   public boolean onCreateOptionsMenu(Menu menu) {
      // Inflate the menu; this adds items to the action bar if it is present.
      getMenuInflater().inflate(R.menu.menu_main, menu);
      return true;
   }

   @Override
   public boolean onOptionsItemSelected(MenuItem item) {
      // Handle action bar item clicks here. The action bar will
      // automatically handle clicks on the Home/Up button, so long
      // as you specify a parent activity in AndroidManifest.xml.

      int id = item.getItemId();

      //noinspection SimplifiableIfStatement
      if (id == R.id.action_settings) {
         return true;
      }
      return super.onOptionsItemSelected(item);
   }
}
Following is the modified content of the xml res/layout/activity_main.xml.
<RelativeLayout xmlns:android="http://schemas.android.com/apk/res/android"
   xmlns:tools="http://schemas.android.com/tools" android:layout_width="match_parent"
   android:layout_height="match_parent" android:paddingLeft="@dimen/activity_horizontal_margin"
   android:paddingRight="@dimen/activity_horizontal_margin"
   android:paddingTop="@dimen/activity_vertical_margin"
   android:paddingBottom="@dimen/activity_vertical_margin" tools:context=".MainActivity">

   <TextView android:text="WebView" android:layout_width="wrap_content"
      android:layout_height="wrap_content"
      android:id="@+id/textview"
      android:textSize="35dp"
      android:layout_alignParentTop="true"
      android:layout_centerHorizontal="true" />

   <TextView
      android:layout_width="wrap_content"
      android:layout_height="wrap_content"
      android:text="Tutorials point"
      android:id="@+id/textView"
      android:layout_below="@+id/textview"
      android:layout_centerHorizontal="true"
      android:textColor="#ff7aff24"
      android:textSize="35dp" />

   <EditText
      android:layout_width="wrap_content"
      android:layout_height="wrap_content"
      android:id="@+id/editText"
      android:hint="Enter Text"
      android:focusable="true"
      android:textColorHighlight="#ff7eff15"
      android:textColorHint="#ffff25e6"
      android:layout_marginTop="46dp"
      android:layout_below="@+id/imageView"
      android:layout_alignParentLeft="true"
      android:layout_alignParentStart="true"
      android:layout_alignRight="@+id/imageView"
      android:layout_alignEnd="@+id/imageView" />

   <ImageView
      android:layout_width="wrap_content"
      android:layout_height="wrap_content"
      android:id="@+id/imageView"
      android:src="@drawable/abc"
      android:layout_below="@+id/textView"
      android:layout_centerHorizontal="true" />

   <Button
      android:layout_width="wrap_content"
      android:layout_height="wrap_content"
      android:text="Enter"
      android:id="@+id/button"
      android:layout_alignTop="@+id/editText"
      android:layout_toRightOf="@+id/imageView"
      android:layout_toEndOf="@+id/imageView" />

   <WebView
      android:layout_width="wrap_content"
      android:layout_height="wrap_content"
      android:id="@+id/webView"
      android:layout_below="@+id/button"
      android:layout_alignParentLeft="true"
      android:layout_alignParentStart="true"
      android:layout_alignParentRight="true"
      android:layout_alignParentEnd="true"
      android:layout_alignParentBottom="true" />

</RelativeLayout>
Following is the content of the res/values/string.xml.
<resources>
   <string name="app_name">My Application</string>
   <string name="hello_world">Hello world!</string>
   <string name="action_settings">Settings</string>
</resources>
Following is the content of AndroidManifest.xml file.
<?xml version="1.0" encoding="utf-8"?>
<manifest xmlns:android="http://schemas.android.com/apk/res/android"
   package="com.example.sairamkrishna.myapplication" >
   <uses-permission android:name="android.permission.INTERNET" />
   <application
      android:allowBackup="true"
      android:icon="@mipmap/ic_launcher"
      android:label="@string/app_name"
      android:theme="@style/AppTheme" >

      <activity
         android:name=".MainActivity"
         android:label="@string/app_name" >

         <intent-filter>
            <action android:name="android.intent.action.MAIN" />
            <category android:name="android.intent.category.LAUNCHER" />
         </intent-filter>

      </activity>

   </application>
</manifest>
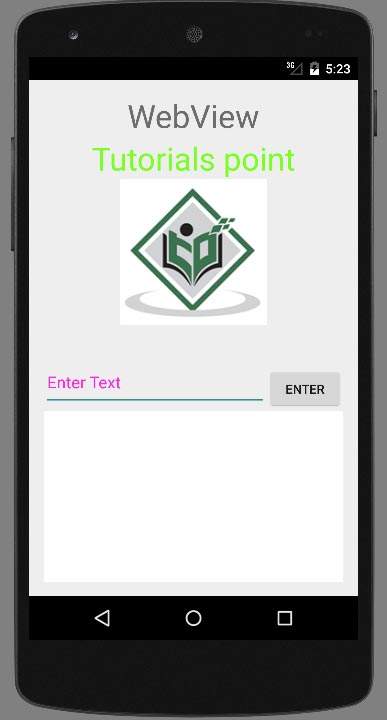
Let's try to run your WebView application. To run the app from Android studio, open one of your project's activity files and click Run  icon from the toolbar. Android studio will display as shown below
 icon from the toolbar. Android studio will display as shown below
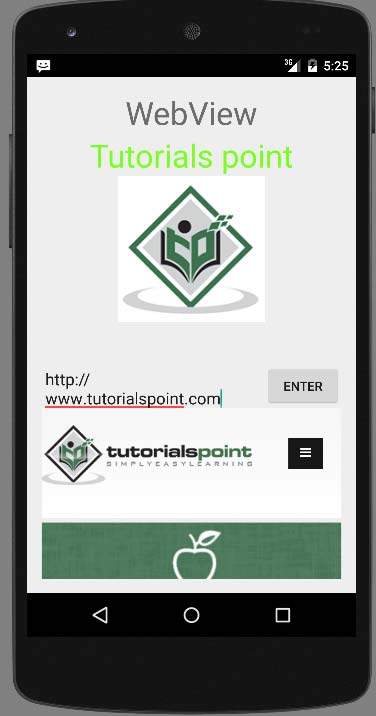
Now just specify a url on the url field and press the browse button that appears,to launch the website. But before that please make sure that you are connected to the internet. After pressing the button, the following screen would appear −

Note. By just changing the url in the url field, your WebView will open your desired website.

Above image shows webview of tutorialspoint.com