Android Internal Storage
Android provides many kinds of storage for applications to store their data. These storage places are shared preferences, internal and external storage, SQLite storage, and storage via network connection.
In this chapter we are going to look at the internal storage. Internal storage is the storage of the private data on the device memory.
By default these files are private and are accessed by only your application and get deleted , when user delete your application.
Writing file
In order to use internal storage to write some data in the file, call the openFileOutput() method with the name of the file and the mode. The mode could be private , public e.t.c. Its syntax is given below −
FileOutputStream fOut = openFileOutput("file name here",MODE_WORLD_READABLE);
The method openFileOutput() returns an instance of FileOutputStream. So you receive it in the object of FileInputStream. After that you can call write method to write data on the file. Its syntax is given below −
String str = "data";
fOut.write(str.getBytes());
fOut.close();
Reading file
In order to read from the file you just created , call the openFileInput() method with the name of the file. It returns an instance of FileInputStream. Its syntax is given below −
FileInputStream fin = openFileInput(file);
After that, you can call read method to read one character at a time from the file and then you can print it. Its syntax is given below −
int c;
String temp="";
while( (c = fin.read()) != -1){
   temp = temp + Character.toString((char)c);
}

//string temp contains all the data of the file.
fin.close();
Apart from the the methods of write and close, there are other methods provided by theFileOutputStream class for better writing files. These methods are listed below −
| Sr.No | Method & description |
|---|---|
| 1 | FileOutputStream(File file, boolean append) This method constructs a new FileOutputStream that writes to file. |
| 2 | getChannel() This method returns a write-only FileChannel that shares its position with this stream |
| 3 | getFD() This method returns the underlying file descriptor |
| 4 | write(byte[] buffer, int byteOffset, int byteCount) This method Writes count bytes from the byte array buffer starting at position offset to this stream |
Apart from the the methods of read and close, there are other methods provided by the FileInputStreamclass for better reading files. These methods are listed below −
| Sr.No | Method & description |
|---|---|
| 1 | available() This method returns an estimated number of bytes that can be read or skipped without blocking for more input |
| 2 | getChannel() This method returns a read-only FileChannel that shares its position with this stream |
| 3 | getFD() This method returns the underlying file descriptor |
| 4 | read(byte[] buffer, int byteOffset, int byteCount) This method reads at most length bytes from this stream and stores them in the byte array b starting at offset |
Example
Here is an example demonstrating the use of internal storage to store and read files. It creates a basic storage application that allows you to read and write from internal storage.
To experiment with this example, you can run this on an actual device or in an emulator.
| Steps | Description |
|---|---|
| 1 | You will use Android Studio IDE to create an Android application under a package com.example.sairamkrishna.myapplication. While creating this project, make sure you Target SDK and Compile With at the latest version of Android SDK to use higher levels of APIs. |
| 2 | Modify src/MainActivity.java file to add necessary code. |
| 3 | Modify the res/layout/activity_main to add respective XML components |
| 4 | Run the application and choose a running android device and install the application on it and verify the results |
Following is the content of the modified main activity file src/MainActivity.java.
package com.example.sairamkrishna.myapplication;

import android.app.Activity;
import android.os.Bundle;
import android.view.Menu;
import android.view.MenuItem;
import android.view.View;
import android.widget.Button;
import android.widget.EditText;
import android.widget.TextView;
import android.widget.Toast;
import java.io.FileInputStream;
import java.io.FileOutputStream;

public class MainActivity extends Activity  {
   Button b1,b2;
   TextView tv;
   EditText ed1;

   String data;
   private String file = "mydata";

   @Override
   protected void onCreate(Bundle savedInstanceState) {
      super.onCreate(savedInstanceState);
      setContentView(R.layout.activity_main);

      b1=(Button)findViewById(R.id.button);
      b2=(Button)findViewById(R.id.button2);

      ed1=(EditText)findViewById(R.id.editText);
      tv=(TextView)findViewById(R.id.textView2);
      b1.setOnClickListener(new View.OnClickListener() {
         @Override
         public void onClick(View v) {
            data=ed1.getText().toString();

            try {
               FileOutputStream fOut = openFileOutput(file,MODE_WORLD_READABLE);
               fOut.write(data.getBytes());
               fOut.close();
               Toast.makeText(getBaseContext(),"file saved",Toast.LENGTH_SHORT).show();
            }

            catch (Exception e) {
               // TODO Auto-generated catch block
               e.printStackTrace();
            }
         }
      });

      b2.setOnClickListener(new View.OnClickListener() {
         @Override
         public void onClick(View v) {
            try{
               FileInputStream fin = openFileInput(file);
               int c;
               String temp="";

               while( (c = fin.read()) != -1){
                  temp = temp + Character.toString((char)c);
               }
               tv.setText(temp);
               Toast.makeText(getBaseContext(),"file read",Toast.LENGTH_SHORT).show();
            }
            catch(Exception e){
            }
         }
      });
   }

   @Override
   public boolean onCreateOptionsMenu(Menu menu) {
      // Inflate the menu; this adds items to the action bar if it is present.
      getMenuInflater().inflate(R.menu.menu_main, menu);
      return true;
   }

   @Override
   public boolean onOptionsItemSelected(MenuItem item) {
      // Handle action bar item clicks here. The action bar will
      // automatically handle clicks on the Home/Up button, so long
      // as you specify a parent activity in AndroidManifest.xml.

      int id = item.getItemId();

      //noinspection SimplifiableIfStatement
      if (id == R.id.action_settings) {
         return true;
      }
      return super.onOptionsItemSelected(item);
   }
}
Following is the modified content of the xml res/layout/activity_main.xml.
<RelativeLayout xmlns:android="http://schemas.android.com/apk/res/android"
   xmlns:tools="http://schemas.android.com/tools" android:layout_width="match_parent"
   android:layout_height="match_parent" android:paddingLeft="@dimen/activity_horizontal_margin"
   android:paddingRight="@dimen/activity_horizontal_margin"
   android:paddingTop="@dimen/activity_vertical_margin"
   android:paddingBottom="@dimen/activity_vertical_margin" tools:context=".MainActivity">

   <TextView android:text="Internal storage" android:layout_width="wrap_content"
      android:layout_height="wrap_content"
      android:id="@+id/textview"
      android:textSize="35dp"
      android:layout_alignParentTop="true"
      android:layout_centerHorizontal="true" />

   <TextView
      android:layout_width="wrap_content"
      android:layout_height="wrap_content"
      android:text="Tutorials point"
      android:id="@+id/textView"
      android:layout_below="@+id/textview"
      android:layout_centerHorizontal="true"
      android:textColor="#ff7aff24"
      android:textSize="35dp" />

   <Button
      android:layout_width="wrap_content"
      android:layout_height="wrap_content"
      android:text="Save"
      android:id="@+id/button"
      android:layout_alignParentBottom="true"
      android:layout_alignLeft="@+id/textView"
      android:layout_alignStart="@+id/textView" />

   <EditText
      android:layout_width="wrap_content"
      android:layout_height="wrap_content"
      android:id="@+id/editText"
      android:hint="Enter Text"
      android:focusable="true"
      android:textColorHighlight="#ff7eff15"
      android:textColorHint="#ffff25e6"
      android:layout_below="@+id/imageView"
      android:layout_alignRight="@+id/textView"
      android:layout_alignEnd="@+id/textView"
      android:layout_marginTop="42dp"
      android:layout_alignLeft="@+id/imageView"
      android:layout_alignStart="@+id/imageView" />

   <ImageView
      android:layout_width="wrap_content"
      android:layout_height="wrap_content"
      android:id="@+id/imageView"
      android:src="@drawable/abc"
      android:layout_below="@+id/textView"
      android:layout_centerHorizontal="true" />

   <Button
      android:layout_width="wrap_content"
      android:layout_height="wrap_content"
      android:text="load"
      android:id="@+id/button2"
      android:layout_alignTop="@+id/button"
      android:layout_alignRight="@+id/editText"
      android:layout_alignEnd="@+id/editText" />

   <TextView
      android:layout_width="wrap_content"
      android:layout_height="wrap_content"
      android:text="Read"
      android:id="@+id/textView2"
      android:layout_below="@+id/editText"
      android:layout_toLeftOf="@+id/button2"
      android:layout_toStartOf="@+id/button2"
      android:textColor="#ff5bff1f"
      android:textSize="25dp" />

</RelativeLayout>
Following is the content of the res/values/string.xml.
<resources>
   <string name="app_name">My Application</string>
   <string name="hello_world">Hello world!</string>
   <string name="action_settings">Settings</string>
</resources>
Following is the content of AndroidManifest.xml file.
<?xml version="1.0" encoding="utf-8"?>
<manifest xmlns:android="http://schemas.android.com/apk/res/android"
   package="com.example.sairamkrishna.myapplication" >
   <application
      android:allowBackup="true"
      android:icon="@mipmap/ic_launcher"
      android:label="@string/app_name"
      android:theme="@style/AppTheme" >

      <activity
         android:name=".MainActivity"
         android:label="@string/app_name" >

         <intent-filter>
            <action android:name="android.intent.action.MAIN" />
            <category android:name="android.intent.category.LAUNCHER" />
         </intent-filter>

      </activity>

   </application>
</manifest>
Let's try to run our Storage application we just modified. I assume you had created your AVD while doing environment setup. To run the app from Android studio, open one of your project's activity files and click Run  icon from the tool bar. Android studio installs the app on your AVD and starts it and if everything is fine with your set-up and application, it will display following Emulator window −
icon from the tool bar. Android studio installs the app on your AVD and starts it and if everything is fine with your set-up and application, it will display following Emulator window −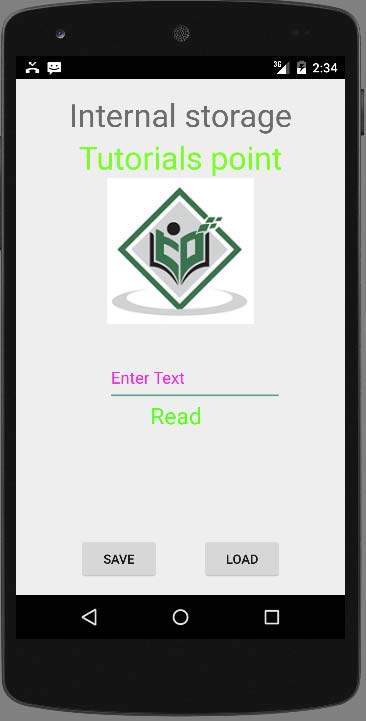
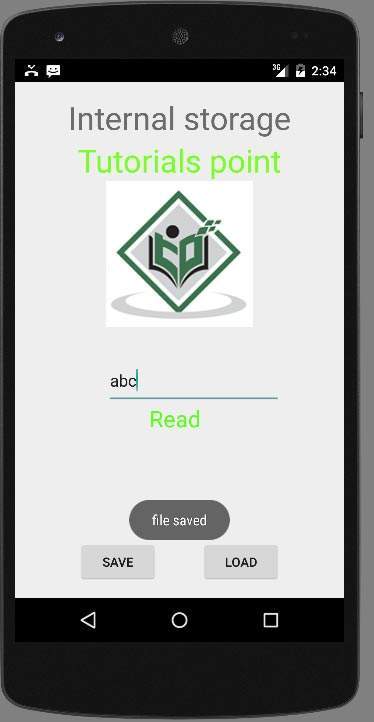
Now what you need to do is to enter any text in the field. For example , i have entered some text. Press the save button. The following notification would appear in you AVD −
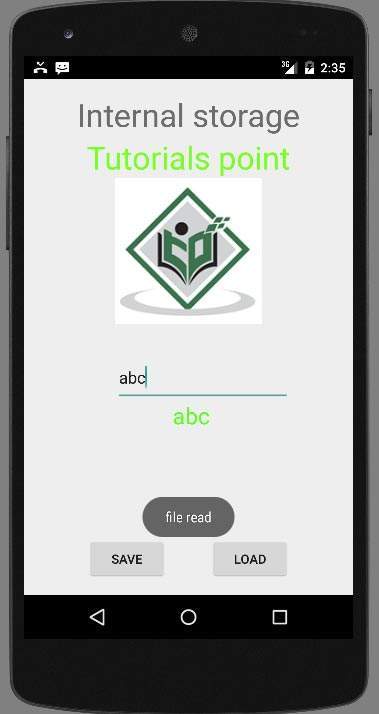
Now when you press the load button, the application will read the file , and display the data. In case of our, following data would be returned −
Note you can actually view this file by switching to DDMS tab. In DDMS , select file explorer and navigate this path.
tools>android>android device Monitor
This has also been shown in the image below.
