Android Login Screen
A login application is the screen asking your credentials to login to some particular application. You might have seen it when logging into facebook,twitter e.t.c
This chapter explains, how to create a login screen and how to manage security when false attempts are made.
First you have to define two TextView asking username and password of the user. The password TextView must have inputType set to password. Its syntax is given below −
<EditText
   android:id="@+id/editText2"
   android:layout_width="wrap_content"
   android:layout_height="wrap_content"
   android:inputType="textPassword" />

<EditText
   android:id="@+id/editText1"
   android:layout_width="wrap_content"
   android:layout_height="wrap_content"
/>
Define a button with login text and set its onClick Property. After that define the function mentioned in the onClick property in the java file.
<Button
   android:id="@+id/button1"
   android:layout_width="wrap_content"
   android:layout_height="wrap_content"
   android:onClick="login"
   android:text="@string/Login"
/>
In the java file, inside the method of onClick get the username and passwords text using getText() andtoString() method and match it with the text using equals() function.
EditText username = (EditText)findViewById(R.id.editText1);
EditText password = (EditText)findViewById(R.id.editText2);
public void login(View view){
   if(username.getText().toString().equals("admin") && password.getText().toString().equals("admin")){

   //correcct password
   }else{
   //wrong password
}
The last thing you need to do is to provide a security mechanism, so that unwanted attempts should be avoided. For this initialize a variable and on each false attempt, decrement it. And when it reaches to 0, disable the login button.
int counter = 3;
counter--;
if(counter==0){
//disble the button, close the application e.t.c
}
Example
Here is an example demonstrating a login application. It creates a basic application that gives you only three attempts to login to an application.
To experiment with this example , you can run this on an actual device or in an emulator.
| Steps | Description |
|---|---|
| 1 | You will use Android studio to create an Android application under a package com.example.sairamkrishna.myapplication. While creating this project, make sure you Target SDK and Compile With at the latest version of Android SDK to use higher levels of APIs. |
| 3 | Modify src/MainActivity.java file to add necessary code. |
| 4 | Modify the res/layout/activity_main to add respective XML components |
| 5 | Run the application and choose a running android device and install the application on it and verify the results |
Following is the content of the modified main activity file src/MainActivity.java.
package com.example.sairamkrishna.myapplication;

import android.app.Activity;
import android.graphics.Color;
import android.os.Bundle;

import android.view.Menu;
import android.view.MenuItem;
import android.view.View;

import android.webkit.WebView;
import android.webkit.WebViewClient;

import android.widget.Button;
import android.widget.EditText;
import android.widget.TextView;
import android.widget.Toast;

import java.io.FileInputStream;
import java.io.FileOutputStream;

public class MainActivity extends Activity  {
   Button b1,b2;
   EditText ed1,ed2;

   TextView tx1;
   int counter = 3;

   @Override
   protected void onCreate(Bundle savedInstanceState) {
      super.onCreate(savedInstanceState);
      setContentView(R.layout.activity_main);

      b1=(Button)findViewById(R.id.button);
      ed1=(EditText)findViewById(R.id.editText);
      ed2=(EditText)findViewById(R.id.editText2);

      b2=(Button)findViewById(R.id.button2);
      tx1=(TextView)findViewById(R.id.textView3);
      tx1.setVisibility(View.GONE);

      b1.setOnClickListener(new View.OnClickListener() {
         @Override
         public void onClick(View v) {
            if(ed1.getText().toString().equals("admin") &&

            ed2.getText().toString().equals("admin")) {
               Toast.makeText(getApplicationContext(), "Redirecting...",Toast.LENGTH_SHORT).show();
            }
            else{
               Toast.makeText(getApplicationContext(), "Wrong Credentials",Toast.LENGTH_SHORT).show();

               tx1.setVisibility(View.VISIBLE);
               tx1.setBackgroundColor(Color.RED);
               counter--;
               tx1.setText(Integer.toString(counter));

               if (counter == 0) {
                  b1.setEnabled(false);
               }
            }
         }
      });

      b2.setOnClickListener(new View.OnClickListener() {
         @Override
         public void onClick(View v) {
            finish();
         }
      });
   }

   @Override
   public boolean onCreateOptionsMenu(Menu menu) {
      // Inflate the menu; this adds items to the action bar if it is present.
      getMenuInflater().inflate(R.menu.menu_main, menu);
      return true;
   }

   @Override
   public boolean onOptionsItemSelected(MenuItem item) {
      // Handle action bar item clicks here. The action bar will
      // automatically handle clicks on the Home/Up button, so long
      // as you specify a parent activity in AndroidManifest.xml.

      int id = item.getItemId();

      //noinspection SimplifiableIfStatement
      if (id == R.id.action_settings) {
         return true;
      }
      return super.onOptionsItemSelected(item);
   }
}
Following is the modified content of the xml res/layout/activity_main.xml.
<RelativeLayout xmlns:android="http://schemas.android.com/apk/res/android"
   xmlns:tools="http://schemas.android.com/tools" android:layout_width="match_parent"
   android:layout_height="match_parent" android:paddingLeft="@dimen/activity_horizontal_margin"
   android:paddingRight="@dimen/activity_horizontal_margin"
   android:paddingTop="@dimen/activity_vertical_margin"
   android:paddingBottom="@dimen/activity_vertical_margin" tools:context=".MainActivity">

   <TextView android:text="Login" android:layout_width="wrap_content"
      android:layout_height="wrap_content"
      android:id="@+id/textview"
      android:textSize="35dp"
      android:layout_alignParentTop="true"
      android:layout_centerHorizontal="true" />

   <TextView
      android:layout_width="wrap_content"
      android:layout_height="wrap_content"
      android:text="Tutorials point"
      android:id="@+id/textView"
      android:layout_below="@+id/textview"
      android:layout_centerHorizontal="true"
      android:textColor="#ff7aff24"
      android:textSize="35dp" />

   <EditText
      android:layout_width="wrap_content"
      android:layout_height="wrap_content"
      android:id="@+id/editText"
      android:hint="Enter Name"
      android:focusable="true"
      android:textColorHighlight="#ff7eff15"
      android:textColorHint="#ffff25e6"
      android:layout_marginTop="46dp"
      android:layout_below="@+id/imageView"
      android:layout_alignParentLeft="true"
      android:layout_alignParentStart="true"
      android:layout_alignParentRight="true"
      android:layout_alignParentEnd="true" />

   <ImageView
      android:layout_width="wrap_content"
      android:layout_height="wrap_content"
      android:id="@+id/imageView"
      android:src="@drawable/abc"
      android:layout_below="@+id/textView"
      android:layout_centerHorizontal="true" />

   <EditText
      android:layout_width="wrap_content"
      android:layout_height="wrap_content"
      android:inputType="textPassword"
      android:ems="10"
      android:id="@+id/editText2"
      android:layout_below="@+id/editText"
      android:layout_alignParentLeft="true"
      android:layout_alignParentStart="true"
      android:layout_alignRight="@+id/editText"
      android:layout_alignEnd="@+id/editText"
      android:textColorHint="#ffff299f"
      android:hint="Password" />

   <TextView
      android:layout_width="wrap_content"
      android:layout_height="wrap_content"
      android:text="Attempts Left:"
      android:id="@+id/textView2"
      android:layout_below="@+id/editText2"
      android:layout_alignParentLeft="true"
      android:layout_alignParentStart="true"
      android:textSize="25dp" />

   <TextView
      android:layout_width="wrap_content"
      android:layout_height="wrap_content"
      android:text="New Text"
      android:id="@+id/textView3"
      android:layout_alignTop="@+id/textView2"
      android:layout_alignParentRight="true"
      android:layout_alignParentEnd="true"
      android:layout_alignBottom="@+id/textView2"
      android:layout_toEndOf="@+id/textview"
      android:textSize="25dp"
      android:layout_toRightOf="@+id/textview" />

   <Button
      android:layout_width="wrap_content"
      android:layout_height="wrap_content"
      android:text="login"
      android:id="@+id/button"
      android:layout_alignParentBottom="true"
      android:layout_toLeftOf="@+id/textview"
      android:layout_toStartOf="@+id/textview" />

   <Button
      android:layout_width="wrap_content"
      android:layout_height="wrap_content"
      android:text="Cancel"
      android:id="@+id/button2"
      android:layout_alignParentBottom="true"
      android:layout_toRightOf="@+id/textview"
      android:layout_toEndOf="@+id/textview" />

</RelativeLayout>
Following is the content of the res/values/string.xml.
<resources>
   <string name="app_name">My Application</string>
   <string name="hello_world">Hello world!</string>
   <string name="action_settings">Settings</string>
</resources>
Following is the content of AndroidManifest.xml file.
<?xml version="1.0" encoding="utf-8"?>
<manifest xmlns:android="http://schemas.android.com/apk/res/android"
   package="com.example.sairamkrishna.myapplication" >

   <uses-permission android:name="android.permission.INTERNET" />

   <application
      android:allowBackup="true"
      android:icon="@mipmap/ic_launcher"
      android:label="@string/app_name"
      android:theme="@style/AppTheme" >

      <activity
         android:name=".MainActivity"
         android:label="@string/app_name" >

         <intent-filter>
            <action android:name="android.intent.action.MAIN" />
            <category android:name="android.intent.category.LAUNCHER" />
         </intent-filter>

      </activity>

   </application>
</manifest>
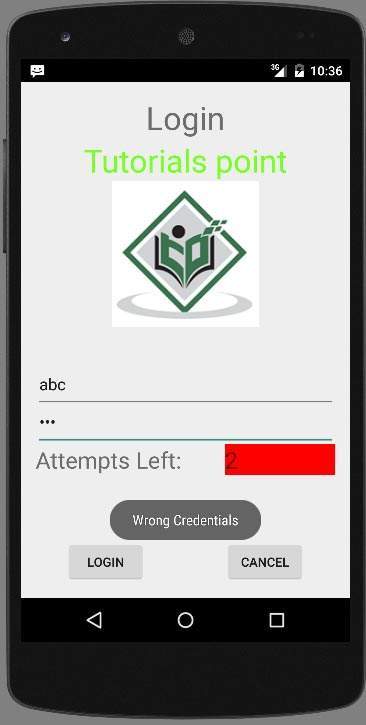
Let's try to run our application we just modified. I assume you had created your AVD while doing environment setup. To run the app from Android studio, open one of your project's activity files and click Run  icon from the toolbar. Android studio installs the app on your AVD and starts it and if everything is fine with your setup and application, it will display following Emulator window −
 icon from the toolbar. Android studio installs the app on your AVD and starts it and if everything is fine with your setup and application, it will display following Emulator window −
Type anything in the username and password field, and then press the login button. I put abc in the username field and abc in the password field. I got failed attempt. This is shown below −

Do this two more time, and you will see that you have 0 login attempts left and your login button is disabled.
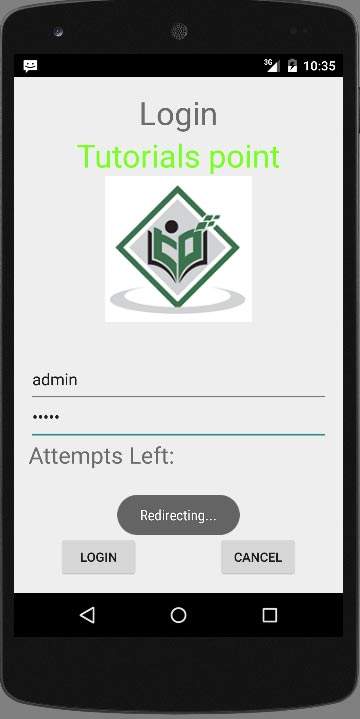
Now open the application again, and this time enter correct username as admin and password as admin and click on login. You will be successfully login.

If user press on cancel button, it will close an application of login screen.