Android XML Parser
XML stands for Extensible Mark-up Language.XML is a very popular format and commonly used for sharing data on the internet. This chapter explains how to parse the XML file and extract necessary information from it.
Android provides three types of XML parsers which are DOM,SAX and XMLPullParser. Among all of them android recommend XMLPullParser because it is efficient and easy to use. So we are going to use XMLPullParser for parsing XML
The first step is to identify the fields in the XML data in which you are interested in. For example. In the XML given below we interested in getting temperature only.
<?xml version="1.0"?>
<current>

   <city id="2643743" name="London">
      <coord lon="-0.12574" lat="51.50853"/>
      <country>GB</country>
      <sun rise="2013-10-08T06:13:56" set="2013-10-08T17:21:45"/>
   </city>

   <temperature value="289.54" min="289.15" max="290.15" unit="kelvin"/>
   <humidity value="77" unit="%"/>
   <pressure value="1025" unit="hPa"/>
</country>
XML - Elements
An xml file consist of many components. Here is the table defining the components of an XML file and their description.
| Sr.No | Component & description |
|---|---|
| 1 | Prolog An XML file starts with a prolog. The first line that contains the information about a file is prolog |
| 2 | Events An XML file has many events. Event could be like this. Document starts , Document ends, Tag start , Tag end and Text e.t.c |
| 3 | Text Apart from tags and events, and xml file also contains simple text. Such as GB is a text in the country tag. |
| 4 | Attributes Attributes are the additional properties of a tag such as value e.t.c |
XML - Parsing
In the next step, we will create XMLPullParser object , but in order to create that we will first create XmlPullParserFactory object and then call its newPullParser() method to create XMLPullParser. Its syntax is given below −
private XmlPullParserFactory xmlFactoryObject = XmlPullParserFactory.newInstance();
private XmlPullParser myparser = xmlFactoryObject.newPullParser();
The next step involves specifying the file for XmlPullParser that contains XML. It could be a file or could be a Stream. In our case it is a stream.Its syntax is given below −
myparser.setInput(stream, null);
The last step is to parse the XML. An XML file consist of events, Name, Text, AttributesValue e.t.c. So XMLPullParser has a separate function for parsing each of the component of XML file. Its syntax is given below −
int event = myParser.getEventType();
while (event != XmlPullParser.END_DOCUMENT)
{
   String name=myParser.getName();
   switch (event){
      case XmlPullParser.START_TAG:
      break;

      case XmlPullParser.END_TAG:
      if(name.equals("temperature")){
         temperature = myParser.getAttributeValue(null,"value");
      }
      break;
   }
   event = myParser.next();
}
The method getEventType returns the type of event that happens. e.g: Document start , tag start e.t.c. The method getName returns the name of the tag and since we are only interested in temperature , so we just check in conditional statement that if we got a temperature tag , we call the method getAttributeValue to return us the value of temperature tag.
Apart from the these methods, there are other methods provided by this class for better parsing XML files. These methods are listed below −
| Sr.No | Method & description |
|---|---|
| 1 | getAttributeCount() This method just Returns the number of attributes of the current start tag |
| 2 | getAttributeName(int index) This method returns the name of the attribute specified by the index value |
| 3 | getColumnNumber() This method returns the Returns the current column number, starting from 0. |
| 4 | getDepth() This method returns Returns the current depth of the element. |
| 5 | getLineNumber() Returns the current line number, starting from 1. |
| 6 | getNamespace() This method returns the name space URI of the current element. |
| 7 | getPrefix() This method returns the prefix of the current element |
| 8 | getName() This method returns the name of the tag |
| 9 | getText() This method returns the text for that particular element |
| 10 | isWhitespace() This method checks whether the current TEXT event contains only whitespace characters. |
Example
Here is an example demonstrating the use of XMLPullParser class. It creates a basic Weather application that allows you to parse XML from google weather api and show the result.
To experiment with this example, you can run this on an actual device or in an emulator.
| Steps | Description |
|---|---|
| 1 | You will use Android studio to create an Android application under a package com.example.sairamkrishna.myapplication. While creating this project, make sure you Target SDK and Compile With at the latest version of Android SDK to use higher levels of APIs. |
| 2 | Modify src/MainActivity.java file to add necessary code. |
| 3 | Modify the res/layout/activity_main to add respective XML components |
| 4 | Create a new java file under src/HandleXML.java to fetch and parse XML data |
| 5 | Modify AndroidManifest.xml to add necessary internet permission |
| 6 | Run the application and choose a running android device and install the application on it and verify the results |
Following is the content of the modified main activity file MainActivity.java.
package com.example.sairamkrishna.myapplication;

import android.content.Context;
import android.content.Intent;
import android.content.SharedPreferences;

import android.graphics.Typeface;
import android.support.v7.app.ActionBarActivity;
import android.os.Bundle;

import android.view.Menu;
import android.view.MenuItem;
import android.view.View;

import android.widget.Button;
import android.widget.EditText;
import android.widget.TextView;
import android.widget.Toast;
com.example.sairamkrishna.myapplication

public class MainActivity extends ActionBarActivity {
   EditText ed1,ed2,ed3,ed4,ed5;

   private String url1 = "http://api.openweathermap.org/data/2.5/weather?q=";
   private String url2 = "&mode=xml";
   private HandleXML obj;
   Button b1;

   protected void onCreate(Bundle savedInstanceState) {
      super.onCreate(savedInstanceState);
      setContentView(R.layout.activity_main);
      b1=(Button)findViewById(R.id.button);

      ed1=(EditText)findViewById(R.id.editText);
      ed2=(EditText)findViewById(R.id.editText2);
      ed3=(EditText)findViewById(R.id.editText3);
      ed4=(EditText)findViewById(R.id.editText4);
      ed5=(EditText)findViewById(R.id.editText5);

      b1.setOnClickListener(new View.OnClickListener() {
         @Override
         public void onClick(View v) {
            String url = ed1.getText().toString();
            String finalUrl = url1 + url + url2;
            ed2.setText(finalUrl);

            obj = new HandleXML(finalUrl);
            obj.fetchXML();

            while(obj.parsingComplete);
            ed2.setText(obj.getCountry());
            ed3.setText(obj.getTemperature());
            ed4.setText(obj.getHumidity());
            ed5.setText(obj.getPressure());
         }
      });
   }

   @Override
   public boolean onCreateOptionsMenu(Menu menu) {
      // Inflate the menu; this adds items to the action bar if it is present.
      getMenuInflater().inflate(R.menu.menu_main, menu);
      return true;
   }

   @Override
   public boolean onOptionsItemSelected(MenuItem item) {
      // Handle action bar item clicks here. The action bar will
      // automatically handle clicks on the Home/Up button, so long
      // as you specify a parent activity in AndroidManifest.xml.

      int id = item.getItemId();

      //noinspection SimplifiableIfStatement
      if (id == R.id.action_settings) {
         return true;
      }
      return super.onOptionsItemSelected(item);
   }
}
Following is the content of src/com.example.xmlparser/HandleXML.java.
package com.example.sairamkrishna.myapplication;

import org.xmlpull.v1.XmlPullParser;
import org.xmlpull.v1.XmlPullParserFactory;
import java.io.InputStream;
import java.net.HttpURLConnection;
import java.net.URL;

/**
 * Created by Sairamkrishna on 4/11/2015.
 */
public class HandleXML {
   private String country = "county";
   private String temperature = "temperature";
   private String humidity = "humidity";
   private String pressure = "pressure";
   private String urlString = null;
   private XmlPullParserFactory xmlFactoryObject;
   public volatile boolean parsingComplete = true;

   public HandleXML(String url){
      this.urlString = url;
   }

   public String getCountry(){
      return country;
   }

   public String getTemperature(){
      return temperature;
   }

   public String getHumidity(){
      return humidity;
   }

   public String getPressure(){
      return pressure;
   }

   public void parseXMLAndStoreIt(XmlPullParser myParser) {
      int event;
      String text=null;

      try {
         event = myParser.getEventType();

         while (event != XmlPullParser.END_DOCUMENT) {
            String name=myParser.getName();

            switch (event){
               case XmlPullParser.START_TAG:
               break;

               case XmlPullParser.TEXT:
               text = myParser.getText();
               break;

               case XmlPullParser.END_TAG:
               if(name.equals("country")){
                  country = text;
               }

               else if(name.equals("humidity")){
                  humidity = myParser.getAttributeValue(null,"value");
               }

               else if(name.equals("pressure")){
                  pressure = myParser.getAttributeValue(null,"value");
               }

               else if(name.equals("temperature")){
                  temperature = myParser.getAttributeValue(null,"value");
               }

               else{
               }
               break;
            }
            event = myParser.next();
         }
         parsingComplete = false;
      }

      catch (Exception e) {
         e.printStackTrace();
      }
   }

   public void fetchXML(){
      Thread thread = new Thread(new Runnable(){
         @Override
         public void run() {
            try {
               URL url = new URL(urlString);
               HttpURLConnection conn = (HttpURLConnection)url.openConnection();

               conn.setReadTimeout(10000 /* milliseconds */);
               conn.setConnectTimeout(15000 /* milliseconds */);
               conn.setRequestMethod("GET");
               conn.setDoInput(true);
               conn.connect();

               InputStream stream = conn.getInputStream();
               xmlFactoryObject = XmlPullParserFactory.newInstance();
               XmlPullParser myparser = xmlFactoryObject.newPullParser();

               myparser.setFeature(XmlPullParser.FEATURE_PROCESS_NAMESPACES, false);
               myparser.setInput(stream, null);

               parseXMLAndStoreIt(myparser);
               stream.close();
            }
            catch (Exception e) {
               e.printStackTrace();
            }
         }
      });
      thread.start();
   }
}
Following is the modified content of the xml res/layout/activity_main.xml.
<RelativeLayout xmlns:android="http://schemas.android.com/apk/res/android"
   xmlns:tools="http://schemas.android.com/tools" android:layout_width="match_parent"
   android:layout_height="match_parent" android:paddingLeft="@dimen/activity_horizontal_margin"
   android:paddingRight="@dimen/activity_horizontal_margin"
   android:paddingTop="@dimen/activity_vertical_margin"
   android:paddingBottom="@dimen/activity_vertical_margin" tools:context=".MainActivity">

   <TextView
      android:layout_width="wrap_content"
      android:layout_height="wrap_content"
      android:text="XML Fetch"
      android:id="@+id/textView"
      android:layout_alignParentTop="true"
      android:layout_centerHorizontal="true"
      android:textSize="30dp" />

   <TextView
      android:layout_width="wrap_content"
      android:layout_height="wrap_content"
      android:text="Tutorials Point"
      android:id="@+id/textView2"
      android:layout_below="@+id/textView"
      android:layout_centerHorizontal="true"
      android:textSize="35dp"
      android:textColor="#ff16ff01" />

   <EditText
      android:layout_width="wrap_content"
      android:layout_height="wrap_content"
      android:id="@+id/editText"
      android:hint="Location"
      android:layout_below="@+id/textView2"
      android:layout_alignParentLeft="true"
      android:layout_alignParentStart="true"
      android:layout_marginTop="61dp"
      android:layout_alignParentRight="true"
      android:layout_alignParentEnd="true" />

   <Button
      android:layout_width="wrap_content"
      android:layout_height="wrap_content"
      android:text="Weather "
      android:id="@+id/button"
      android:layout_below="@+id/editText"
      android:layout_centerHorizontal="true" />

   <EditText
      android:layout_width="wrap_content"
      android:layout_height="wrap_content"
      android:id="@+id/editText2"
      android:layout_below="@+id/button"
      android:layout_alignParentLeft="true"
      android:layout_alignParentStart="true"
      android:layout_alignRight="@+id/editText"
      android:layout_alignEnd="@+id/editText"
      android:text="Currency" />

   <EditText
      android:layout_width="wrap_content"
      android:layout_height="wrap_content"
      android:id="@+id/editText3"
      android:layout_below="@+id/editText2"
      android:layout_alignParentLeft="true"
      android:layout_alignParentStart="true"
      android:layout_alignParentRight="true"
      android:layout_alignParentEnd="true"
      android:text="Temp" />

   <EditText
      android:layout_width="wrap_content"
      android:layout_height="wrap_content"
      android:id="@+id/editText4"
      android:layout_below="@+id/editText3"
      android:layout_alignParentLeft="true"
      android:layout_alignParentStart="true"
      android:layout_alignRight="@+id/editText3"
      android:layout_alignEnd="@+id/editText3"
      android:text="Humidity" />

   <EditText
      android:layout_width="wrap_content"
      android:layout_height="wrap_content"
      android:id="@+id/editText5"
      android:layout_below="@+id/editText4"
      android:layout_alignParentLeft="true"
      android:layout_alignParentStart="true"
      android:layout_alignParentRight="true"
      android:layout_alignParentEnd="true"
      android:text="Pressure" />

</RelativeLayout>
Following is the content of AndroidManifest.xml file.
<?xml version="1.0" encoding="utf-8"?>
<manifest xmlns:android="http://schemas.android.com/apk/res/android"
   package="com.example.sairamkrishna.myapplication" >
   <uses-permission android:name="android.permission.INTERNET"/>
   <application
      android:allowBackup="true"
      android:icon="@mipmap/ic_launcher"
      android:label="@string/app_name"
      android:theme="@style/AppTheme" >

      <activity
         android:name=".MainActivity"
         android:label="@string/app_name" >

         <intent-filter>
            <action android:name="android.intent.action.MAIN" />
            <category android:name="android.intent.category.LAUNCHER" />
         </intent-filter>

      </activity>

   </application>
</manifest>
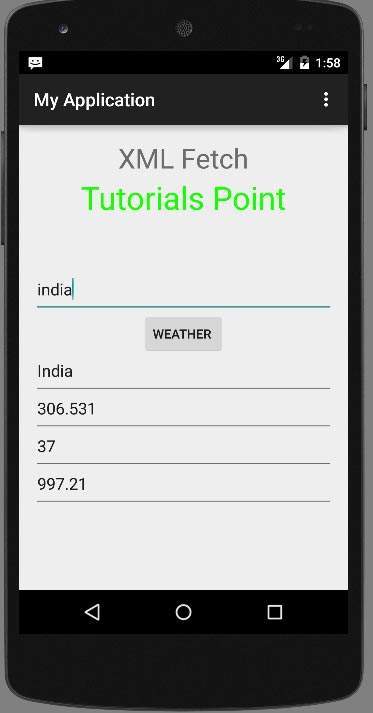
Let's try to run our application we just modified. I assume you had created your AVD while doing environment setup. To run the app from Android studio, open one of your project's activity files and click Run  icon from the toolbar. Android studio installs the app on your AVD and starts it and if everything is fine with your setup and application, it will display following Emulator window −
 icon from the toolbar. Android studio installs the app on your AVD and starts it and if everything is fine with your setup and application, it will display following Emulator window −
Now what you need to do is to enter any location in the location field. For example , i have entered india. Press the weather button , when you enter the location. The following screen would appear in you AVD −

Now when you press the weather button, the application will contact the Google Weather API and will request for your necessary XML location file and will parse it. In case of London following file would be returned −

Note that this temperature is in kelvin, so if you want to convert it into more understandble format , you have to convert it into Celcius.